Sunday, June 10, 2012

New Beauty Favorites

I'm not usually one to try a million different beauty products.  I'm a MAC girl through and through, and whenever I venture out to try one of the latest "it" products, I always find myself slightly disappointed, coming back to my favorites, and wondering why I every strayed in the first place.  However, in the past month I've stumbled upon two products that I've really, really loved!  And shockingly, neither of them are MAC products!

P6100903


Maybelline Studio New York Master Precise Ink Pen Eyeliner: I have been wanting to get on the cat eye trend for ages, but everytime I attempted them, I looked like a five year old who got caught playing in her mom's make up.  Seriously, not pretty.  But when I read this post and heard this liner was perfect for cat eyes newbies, I knew I had to try it.  And guess what?  It is perfect for cat eye newbies!  The tip is more like a pen, as opposed to a brush, so there is less room for veering off of the eyeline.  (Read: there is less of a chance of looking like that overambitious five year old.)  I have also figured out another really important tip for mastering the cat eye.  Don't try to create the cat eye in one straight swoop.  Instead, use shorter, overlapping strokes of eyeliner to create the look, especially on the inner half of your eye.  It seems counterintuitive that multiple short strokes would create a smoother line, but that tip definitely helped me!  I have especially been loving the cat eye trend when paired with bright, summer lips!  (My new favorite, MAC Impassioned, seen here.)

Smashbox Photo Finish Foundation Primer: I've tried a primer before and wasn't particularly crazy with the results.  Instead of helping my foundation last, I found that it just made me shinier sooner.  But when I got this Smashbox primer as a part of a free gift with purchase, I thought I might as well give it a go.  And oh my goodness, I love it!  It gives me a nice extra glow, and overall really helps my makeup last throughout a long day at work.  I'll never forgot the first day I wore it.  I applied it early in the morning and came home ten hours later, after a long day at the work.  As I stood at the sick washing my hands, I caught a glimpse of myself, and did a double take.  My makeup looked just as it had ten hours earlier!  Rather than applying the primer prior to my foundation, I actually mix the two together, adding a pea sized amount of primer in with a dime sized amount of foundation.  I apply the combo using a MAC 187 brush.  After having such great luck with this primer, I thought about trying out the MAC equivalent, but then I realized, why mess with a good thing?

IMG 0656

PS: In other news, I cleaned out my bathroom cabinets this weekend, which included a serious makeup purge.  I am ashamed to say that I filled an entire Quaker Oats container with old MAC products.  I had a ridiculous amount of old and stashed away products that seriously needed to go.  I felt pretty guilt looking at all those products and thinking about how much money was spent them, but then I realized that with the MAC recycling program, the old products won't go completely to waste.  Every six will be a new MAC eyeshadow or lipstick, which means I'm set for the next nine seasons :)  PS: Wondering why I have a Quaker Oats container in my bathroom?  Click here to find out!

Anyone else have any new favorite beauty products to share?

Sunday, May 13, 2012

Misikko Review and GIVEAWAY

5130782

Several months ago, the beauty experts at Misikko, sent over a Hanaair Professional Hair Dryer, one of the top selling products from their Hana Salon.  The people at Misikko sell all things beauty, from hair dryers to curling irons, and I've been lucky to test (and love) several of their products.  I've had my eye on a fancypants hair dryer for a while, but couldn't quite fit the cost into my "why in the world did I ever decide to get a Ph.D" budget.  So I considered it quite serendipitous when they contacted me to review their premiere hair dryer.

I filmed an upboxing video several months ago when I first received the product (see that video here), but rather than review it right away, I decided to use it for a while before I gave it a full review.  Three months have passed, and my final verdict is in.  It is simply amazing.  No joke.  Amazing.  And rather than write a rambling review about it, (cause yall know I can ramble), I decided to list what I love most.

5130771

1. It signicantly reduces drying time.  You probably expected this one, and in reality, it's one of the things I love most about the dryer.  I have insanely thick hair, and if I want to go from shower to completely dry hair, I usually spend about 45 minutes with a hair dryer.  But not now.  My drying time has been cut in half, which gives me more time for morning snoozing.  A win win for me.

2. The hair dryer doesn't get that hot.  I've tried several fancypants hair dryers before, and everytime, I felt the need to keep a fire extinguisher neaby.  The air and the hair dryer itself would get so hot, I could literally feel my hair burning.  But not the Hanaair.  The hot setting in totally manageable, which makes for more pleasant primp sessions and much healthier hair!

3. The settings are simple.  Easy to read switches give me options without feeling overwhelmed.  2 fan speeds, 3 heat settings, and a cold shot.  Sweet and simple, just how I like it.

4. My hair stays straighter for longer between washes.  It's no secret, I've shared before that I only wash my hair twice a week (with the help of dry shampoo.)  It used to be that after I slept on my "day 1 hair," I would wake up with a frizzy mess.  But not anymore.  It's as if the hair dryer completely dries my hair, rather than just drying the outer layers.  It's amazing.

Those things said, I think Matt reviewed the hair dryer best when he said, "You don't know how awesome it is until you use it and then go back to your old dryer."  You see, Matt didn't really see the point in a fancy hair dryer, so he kind of thought I will silly for getting all excited.  So when I packed the hair dryer with me to take on internship, he quickly noted  the difference.  And I have to agree; the difference is impressive.

So if you're in the market for a new hair dryer, wanting something to help cut down your morning dry time, or looking for a way to boost the health of your hair, I'd definitely look into the Hanaair Hair Dryer.  The difference is definitely noticable!  PS: the dryer is super on sale right now, so if you're thinking about buying it, now is an awesome time to scoop it up!

And because the beauty team at Misikko is so incredible, they're offering to give away another Hana miracle product...the Shine Shield.  I've raved about this product before, and I still swear by it.   To be entered to win a 6 oz. bottle of the Shine Shield (an almost $50 value!), click on this link and sign up for the Misikko newsletter.  That's it.  No tweeting, no Facebook following, no extra entries.  Just sign up for the newsletter and leave a comment telling me you did so.  Please include your email address in the comment, so that I can verify you're on the newsletter email list.  The giveaway will close on Tuesday, May 22 at 11:59 pm and is open to US residents only.

A special thanks for Misikko for my fabulous new hair dryer and for offering the Shine Shield to one lucky Smart and Sassy with Sprinkles reader!

PS: Curious about my hair routine?  You can read more about in this post.

Wednesday, March 21, 2012

5 Ways to Save Big on Beauty

Beauty{photo via the coveteur}

Last fall, I took on the September Spending Freeze, a self-imposed challenge to not spend a single cent on non-essential items (i.e. clothes, nail polish, Starbucks, accessories, lip gloss, dinners out, etc.)  It was a life changing experience that really helped me take a closer look at my spending tendencies.  Even after the freeze, the lessons I learned stayed with me, and I've noticed some pretty big changes in the way that spend.  One of the biggest areas I've seen a change in how I shop, revolves around beauty.  Here are a few of my favorite tips for reeling in your beauty budget.

1. Rethink brand loyalty for nonesstential items. I'm not asking you to give up your favorite foundation, your go to hair product, or your never-fail-me lipgloss.  I think it's awesome to know what you love and stick with it, especially for beauty essentials.  But for the not so staple items, consider going for what's on sale, what's the least expensive, or what you have a coupon for.  My favorite example...makeup remover wipes.  I wear a pretty full face of makeup, so for me, removing my makeup prior to cleansing is important.  But what brand I use really doesn't matter.  I like the Neutrogena wipes, but after once getting the Almay wipes at $3 less, I realized, they were pretty much the same, and I'm willing to compromise on that product.  Ask me to give up my MAC brushes for the Target brand and I'll panic, but ask to me switch around on soap, makeup remover, cotton balls, and salon brand nail polish to save a chunk of change, and I'm all for it.

2. Go every other. This has been the biggest help in reducing my beauty budget (and in some cases I've been able to transition to DIY!)  Think about the services you have done on a regular basis.  Manicure, pedicure, highlights, hair cut, waxing, etc.  Now I'm not ready to give those things up completely, but I did start to wonder if I needed to keep such a tight schedule.  Maybe instead getting a manicure every week, I could go one week, then do my own maintenance and manicure the next week.  That's an extra $40 a month ($480 a year!) for just getting my nails done every other time.  On those weeks where I wasn't getting a professional manicure, I was able to do a DIY manicure, with a light and glossy color, my cuticles still maintained from the previous week.  PS: This method of every other was so successful for me, that I eventually got really good at DIY manicures, and now I prefer them!  So think, if you get your hair cut every six weeks, could you stretch it a few extra weeks?  That stretch will save you money, but also probably help you come up with some creative and cute fixes you may not have thought of!  (Example, I started going every other with my hair cuts, and I've rediscovered wearing my hair curly to hide not-quite-perfect ends and cute bobby pins to tuck back longer front pieces.)  If you can stretch yourself to try one thing on this list, it's this.  Go every other and get creative for the time in between!

3. Keep tabs on your stock and shop with a coupon. How many times have you realized you were out of your favorite perfume only to go to Sephora's website and realize the email you got earlier in the week about free shipping just expired?  I've done that one too many times to do it again.  This tip requires you to be aware of your beauty supply and when it's running low.  When your perfume, shampoo, deep conditioner, moisturizer, etc. hits the two-thirds gone mark, start looking to reorder.  That way, you have time to watch for a coupon code, a Sephora email, a free shipping offer, or an Ulta coupon.  And along those lines, don't ever order something from a beauty website without Googling for a coupon code first.  This step takes about ten seconds, but can save you big time.  So watch your bottles and leave yourself time for a great deal of present itself!

4. Don't pay full price for nail polish. I might sound like a bad blogger on this one, but I'm convinced that the big nail polish brands put out the same colors every season, with slight tweaks and new fabulously catchy names.  But the truth is, no one will be able to tell if the gray tone on your nails is Essie Cocktail Bling, OPI Birthday Babe, or the much anticipated Chanel Le Vernis in Frenzy.  I'm all for following trends, so look for what's hot and then search the sale or clearance shelf for last season's version of that.  My local Beauty Brands has the entire OPI Texas collection for 65% off, which is perfect for this season's focus on bright, punchy hues, for a fraction of the price.   Just think, if you buy 4 nail polishes a month this way, you could save $16 a month ($192 a year!)  Score!

5. Use what you have. Sometimes when I dig around the in dark depths of my bathroom cabinents, I find some pretty impressive things.  Full bottles of dry shampoo, a barely touched MAC eyeshadow, a body butter I scored at an after Christmas sale, and ten million fragrance minis from Sephora (several of which I actually like!)  So sometimes I have to get strict with myself and say "No new anything until I use up what I have."  I'll try to reason with myself, saying I'll alternate with the new product, but that's a lie.  The older product will get pushed to the back of the cabinent, and I will have wasted a small chunk of change.  So go digging in your bathroom cabinents, your travel case, and wherever else you store lost beauty products, find what's there and use it before buying anything new.  And if you're anything like me, once you start using what you already had, the urge for the new thing will fade, and you'll be content using up the rest of your stash!

So, there you have it, my 5 most favorite ways to save big on beauty.  In a culture (and a blog world) that often emphasizes the latest and greatest in beauty, I think it's important to realize that we can dial back that spending with a few creative strategies.  So now I'm dying to hear, what are some of your favorite ways to save big on beauty?

Sunday, February 5, 2012

Misikko Review and My First Ever Blog Video


This weekend, I am so excited to share my first ever blog video!  I've gotten lots of requests for a blog video, and after much delay, I finally gave in.  (I really didn't think the whole world needed to experience my Minnie Mouse on video voice!)  The timing was also right, considering that I'm partnering with Misikko for a product review and giveaway.  The package came in the mail this week, and though I haven't yet had a chance to use the products, I thought I'd give you a sneak peek into the package.  (Particularly because Misikko has the most beautiful packaging!)  I'll be back within the next week or two for a full review and giveaway details, but until then, enjoy a first hand look at all the goodies that arrived and an early jump on what you might be able to win!

And let me know what you think about blog videos...more in the future or please don't ever record another one? :)

Thursday, June 30, 2011

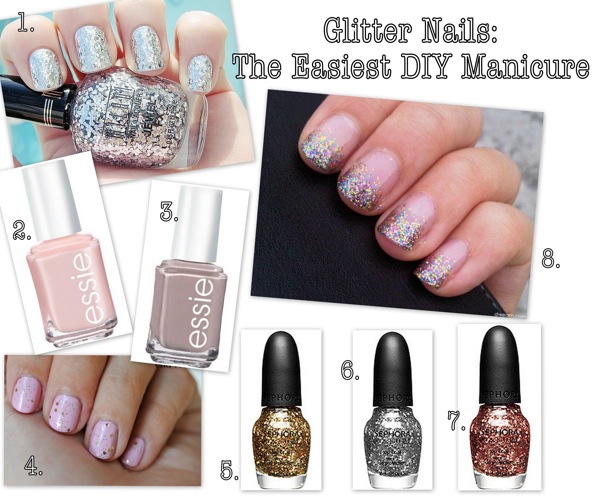
Glitter Nails: The Easiest DIY Manicure

Glitter{via}

Earlier this month, I posted about having to tighten up the old budget, and it seems that several of you are in the same boat.  (As evil as it may sound, its a tad bit comforting to know I'm not the only one trying to keep my Amex in its place this summer!)  The main thing to take a hit during this spending lockdown has been my clothing budget.  I think I can count the number of closet covetables I've purchased since April on one hand.  (A big fete for me!)  But not far behind in the spending lockdown has been my beauty budget.  Luckily, I have a small MAC store under my bathroom sink, so I've been in the clear there.  But I've had to quickly reevaluate my $65 nightime moisturizer, weekly manicures, and like-clockwork highlights.  I traded in the bank breaking moisturizer for a Neutrogena fave and have learned to embrace a bit of roots and stretch out my highlights.  But one of the hardest things for me to give up has been my manicures.

Call me girly, call me high maintainance, whatever, but something about freshly painted nails just makes me happy.  My love for pretty manicures does not translate however into the slightest ounce of skill when it comes to DIY manicures.  Don't get me wrong, I've tried several times, and good heavens, was it a disaster!  No matter how careful I was, no matter how still I tried to be, my manicures always looked like they were the work of a blindfolded first grader wearing thick wooly mittens.  Uneven layers, polish halfway down my fingers...eesh, it was a mess.  But a few weeks ago, this blog post by Lindsay changed my life.  Seriously.  Armed with determination and the realization that I had to cut back on my beauty budget, I gave her tips a go, and holy goodness, what do you know?  It worked! I successfully did my own manicure and didn't have polish smeared on my elbow.  Hallelulah!

Since then, I've sucessfully done two more at home manis, both better than the one before.  So if you're like me and have been longing to get better at DIY manicures and save your bank account unneccesary strain, catch a few tips me...

Recently Updated{12345678}

1. Go read Lindsay's post.
2. Reread it, just to make sure you registered all that goodness.  Seriously.
3. Start sheer, nude, and light with your polish color.  The mistakes aren't as easy to see and you won't spend all night staring at that one spot.  (I mean, its your first time, it won't be perfect!)
4. When painting your nails, start in the middle, painting a stripe down the center of your nail, then slowly moving toward the outside of the nail.  Much easier this way!

And my favorite tip...

5. ADD GLITTER!  I have always loved anything sparkly, glitter nails included, so imagine my delight when I realized glitter is the ideal coverup for not-quite-perfect nails.  My first glitter go was silver layered over an Essie pink, and I can't stop squealing over my cotton candy princess nails.  Now I'm dreaming of a minty green with glitter, glitter tips, glittered ring finger manicures, and black with gold glitter.  Its a whole new world out there yall.  Glitter is the perfect tool for DIY nail newbies!

Needless to say, me, my nails, and my bank account are happy campers.  Expect to see lots of pretty paint jobs and loads of glittered nails around these parts.  If I wasn't already, I'm officially smitten with glitter!  And if you're a hopeless DIY manicurist, give these tips a try.  I swear, if I can do, you can definitely do it!

Anyone else a hopeless manicure DIY-er or a glittered nail lover?

Wednesday, March 9, 2011

All About Hair: Favorites, My Routine, and the Power of Dry Shampoo

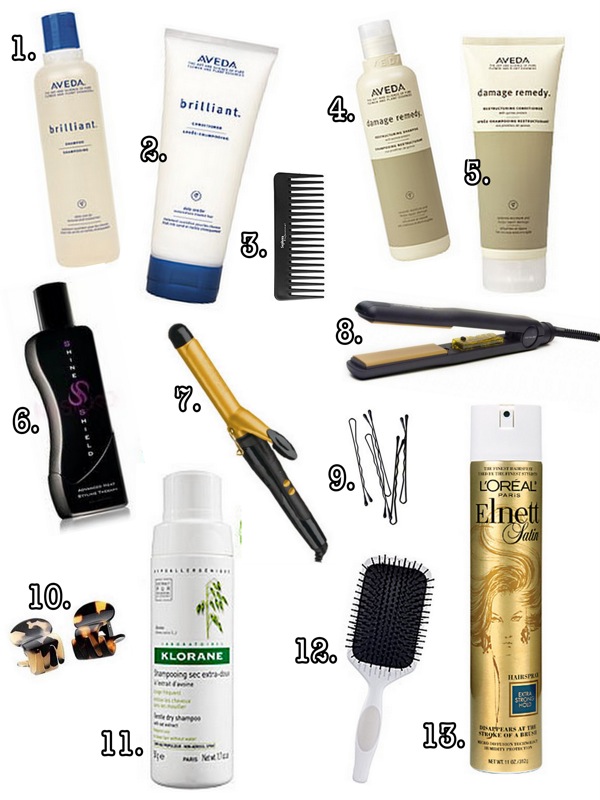
Hair Blog1. Aveda Brilliant Shampoo 2. Aveda Brilliant Conditioner 3. wide tooth comb  4. Aveda Damage Remedy Restructuring Shampoo 5. Aveda Damage Remedy Restructuring Conditioner 6. Hana Shine Shield 7. 1 inch curling iron  8. Corioliss Classic Pro flat iron 9. bobbies  10. claw clips  11.  Klorane dry shampoo 12. paddle brush  13. L'Oreal Elnett hairspray

A good portion of the questions I get on this little blog revolve around my hair.  While I don't think my hair is anything to write home about, many of you have left sweet comments about it and inquired about how I do it, what products I use, etc.  So after much procrastination (and disbelief that anyone actually wants their hair to look like mine) I'm finally putting together a semi-comprehensive hair post.

A few quick words about my hair: its thick, naturally curly, and has taken quite a bit of abuse over the years.  I started highlighting my hair in high school and have continued since.  I'm not quite sure what my natural color is, but judging by some kiddie pics, its probably in the middle of light brown/dirty blonde.  My haircare routine has changed significantly in the past two years, as I've finally listened to my stylist and stopped washing my hair so often.  That simple step has changed my life (more on that later...)

Ok, so first, a few words about some of my go-to products...

Aveda shampoo/conditioner (#1, 2, 4, 5): In my opinion, Aveda has the best of the best when it comes to hair care.  Their products are some of the only products that truly feel nourishing to my hair.  I alternate between the Brilliant line and the Damage Remedy line.  Aveda can get a little pricey, and I buy my shampoo/conditioner in their large liter sizes.  At purchase time, this is a little expensive, but over time, it evens out.  And because I wash my hair every 3ish days, the liter lasts me for quite some time.

Hana Shine Shield (#6): I started using this product back in July when Missiko approached me about doing a review/giveaway.  (You can read the full review here.)  The reviews for this product were raving, and now I completely understand why.  No product has gotten my hair so soft and so straight.  I also think this product does an incredible job at protecting my hair from heat damage.  In years past, I felt like my hair verged on "fried" and since I started using this product (and washing/drying my hair less) I haven't felt this way at all.

Klorane dry shampoo (#11): This is my absolute favorite beauty product to date.  Seriously, I love it.  It has changed my hair life.  My friend/old stylist Hannah tried to convince me for years that I was washing my hair too much.  The constant washing and drying were stripping my hair of its health and its color (which I pay a pretty for lol.)  I kept complaining that there was no way I could go more than a day or two because it got oily on top, blah blah.  Then I started using baby powder in pinch situations, which got to me wanting more out of a powder.  So I finally gave dry shampoo a try, and I haven't looked back.  I've tried about every dry shampoo out there, and this is my absolute favorite.  I prefer to use the non-aerosol version, as it distributes through my hair easier, giving me more uses than the aerosal.  (Many Sephoras don't carry the non-aerosol version in store, so I get it online.)  If I were stranded on a deserted island and could only take five things, this dry shampoo would be a serious contender.  No joke.

L'Oreal Elnett hairspray (#13): Best hairspray on the market, hands down.  It holds no problem, yet isn't sticky or stiff.  I'm from Dallas which makes me a born and bred hairspray connoisseur.  So if I like it, its good.

In the past two years, I have managed to not only nail down my favorite products, but I've also worked out a pretty sweet hair routine.  Yes, that's right, my hair is on a schedule lol.  A well thought out, consistent schedule designed to maximize hair health (as well as my wallet and time in the mornings!)  I won't get too detailed for the sake of sounding weird and creepy, but here is rundown of my routine..

Day 1: Shampoo and condition with Aveda products.  I let my conditioner stay on in the shower for five minutes and right before I rinse it, I run a wide tooth comb through the ends.  (Avoid the roots or they may look greasy later.)  After I towel dry my hair, I run another wide tooth comb through it.  This step has helped reduce frizziness, and on days I skip this step, I can always tell the difference after my hair is dry.  Apply Shine Shield then blow dry with a paddle brush.  Using claw clips to seperate hair, straighten hair in sections.  (I have a lot of hair, so I have to do three layers/sections, bottom, middle, top.)  Look in the mirror, smile, and done!
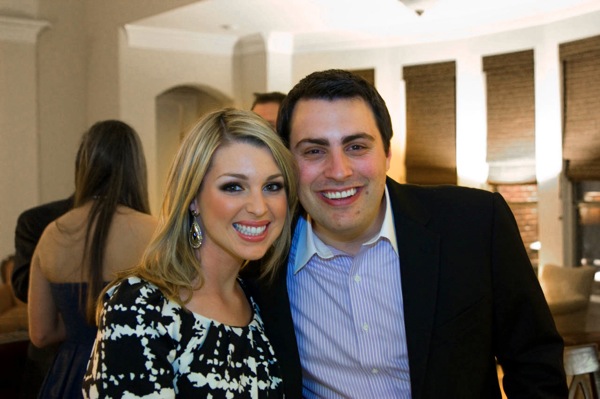
Allison 2{Day 1 hair at my BFF's engagement party}

Day 2: Clip hair up while in the shower, don't get wet.  Blast with blow dryer for a minute or two to freshen up and dry any bit that got wet in the shower.  (Obviously you're OUT of the shower for this part!)  Touch up straightening from the day before, using a less intense version of day one's technique.  Since my hair is naturally curly, its doesn't stay stick straight from day to day, unless I touch it up with a flat iron.  However, I usually do two sections instead of three on this day, and don't hold the straightener on my hair as long.  Smile, done, go!

DSCN3868{Day 2 hair at the apple orchard}

Day 3: Third day hair is always curly.  It helps hide the little bit of dirtiness and is easy and quick to get done.  Clip up, shower, blast with blow dryer.  Spritz/puff dry shampoo on roots, work in with fingers.  Let sit for a few minutes, then gently brush through.  (These directions are on the Klorane bottle.)  Divide hair into three sections (like other days.)  Spray each section with hair spray right before you curl it.  Curl hair using gold 1 inch curling iron.  I use a very similar technique to Tiffany at I Am Stylish.  She is much more precise then me, and I decided to spare yall a tutorial of me bumbling around in my bathroom lol.  See her video tutorial here (fast forward to 4 min-6 min for the main gist.)  After all three sections/layers are curled, spray, spray, spray to hold in place.  Then, I usually take the front little part and pin it back with two criss-crossing bobbies.  I just never like how the all-down and curled look looks on me.  Voila, day 3 hair!  (This is the day I seem to get a lot of blog comments on.)

DSCN4364{Day 3 hair at my little bro's bball game.  Check out that sweet pin lol}

Day 4: I'll often stretch my hair an extra day, especially if I don't have anything major going on.  I know for some people this seems crazy (or gross lol), but had to work my way up to this point before I learned the routine that works for me now.  This day is either a complete repeat of day 3 or a messy bun.  Either way, I use a touch of dry shampoo, but not as much as I did on day 3.

So, that is the not-so-short version of my hair routine lol.  If you are still reading this, I am beyond impressed.  I am kind of disgusted that I blabbed on about my hair for this long, but I wanted to do one thorough post about my hair, rather than break it up into several smaller ones.  For those of you who have emailed and commented with hair questions, I hope this helps.  And if you couldn't give a flip about my hair, lol, sorry.  If you have any additional questions, leave them in the comments, and I'll do my best to answer them.  Also, if you have a product or routine you love, share it in the comments.  I'm always looking for tweaks to add to my routine! :)

Tuesday, July 27, 2010

Hair Tales: A Misikko Review and GIVEAWAY

Today I am doing my first ever product review.  It’s a big step for me people, I mean, a seriously huge mega step.  Here’s the deal.  I love giveaways, and I’ll do them any chance I get.  If Auto Tire USA wants to give away a tire on my blog, sure I’ll do it, you never know what my readers are into.  (Ok, I lie, tires are a stretch.  But you get my point.  I love my readers and therefore, I love hosting giveaways.)  But I’ve always been terribly afraid of doing a product review.  What if I don’t like it, what if the product sucks, what will I say, I can’t lie to my readers?!  See what I mean, sticky situation for sure.  So I’ve kind of avoided the whole review thing.

Until now.  A few weeks ago, Misikko contacted me about doing a product review (and giveaway) for them.  I resisted an instant reply of “sorry I can’t, I break out in hives at the thought of reviewing something I might not like” and decided to browse around their site a bit.  They have a TON of stuff, and I was surprised to see they carry my beloved Chi and my wishlisted Chi blow dryer.  I wasn’t super happy with my current straightening balm and had been feeling in a bit of a hair rut, so I poked around for something else to use.  Then something caught my eye.  The HANA Shine Shield Thermal Protectant.  It was listed as a customer favorite, and the reviews were out of this world amazing.  One girl said she’d never again use anything else and another said it was the best money she’d ever spent in her life.  Umm, ok, apparently this product has a cult following.  I was curious; I had to try it.  The people at Misikko also sent me a Corioliss Classic Pro Flat Iron to review.

Within two days of my order my goodies arrived.  Two points for prompt service.  I opened the box to find beautifully wrapped goodies and a few sample freebies.  Two more points for attention to detail.  But the real test would be using the product.

And oh my goodness, did Misikko ace the test!  The product, specifically the Shine Shield, was unreal.  Unreal as in omg-life-changing-to-my-hair!  I have never ever felt my hair so soft.  Seriously.  My hair is naturally curly and has endured years of smashing, straightening, pulling, tugging, and coloring like nobody’s business.  One time of using the Shine Shield was like undoing all those years of damage.  No joke.  I kept running my hands through my hair, thinking, “This is insane.  It’s so soft, so straight!  Those reviewers weren’t lying.”  I was sold on its softness for sure.  And after a night of club going in downtown Chicago, followed by crashing on a friend’s couch, I woke up with…straight hair.  No way.  Upon waking up, my hair is typically somewhere between frizzy, curly, and knotted.  But after using the Shine Shield 24 hours before, it was still pretty dang straight.  I was sold.  Right there.  On my friend’s couch.  Sold.

DSCN3360Here is me and my hair this morning of using both the Shine Shield and the Corioless.

I’ve used it several times since then with the same results.  Love, love, love.  I couldn’t be happier, and I seriously have not been this happy with a hair product since I discovered dry shampoo.  I’ve been really happy with the Corioless, though I can’t lie, I’m so caught up in the Shine Shield I can’t really focus clearly.  I’ve always been a Chi fan, but the Corioless have several features that the Chi doesn’t.  See below.

DSCN3351

The power light is on the outside of iron.  The light on my Chi is on the inside, so I forget to turn it off all the dang time.  It also turns from red to green when its hot, unlike my Chi, which goes from flashing red to red (or red to flashing red, I’ve never figured it out.)  It also has grippers along the handle which made it a lot easier to maneuver.  It didn’t slide quite as easily through my hair as my Chi, but I think that is because its brand new and doesn’t have years of product buildup on it :)  After a few days of using it, I realized the tighter grip actually helped straighten my hair better.

So the verdict is in.  The HANA Shine Shield is out of this world amazing, and I’d like to order an endless supply today.  Not kidding.  The flat iron did its thing and gave me straight, straight hair.  And Misikko is a great little site that I clearly need to be ordering from more.

But, guess what?  You don’t have to take my word for it, because Misikko is giving you a chance to WIN these beloved goodies…woo hoo!  A review and a giveaway, I’m in blogger heaven.  (Did I mention the giveaway goodies are valued at $250?)  So…here’s how to win (and there are lots of ways!)

1. You must be a follower to of Smart and Sassy with Sprinkles to win.  (If you’re not already a follower, just become one, it’s easy!)  Leave a comment to enter.  Any comment will do :)

For additional entries…

2. Follow Misikko on Twitter (@misikko)

4. Blog about the giveaway on a personal website and leave me the link in a comment so I can check it out.

5. Join Misikko’s newsletter (3 extra entries)

4. “Like” Misikko on Facebook(www.facebook.com/MisikkoBeauty)

5. Interact with Misikko’s Facebook – Comment on a post or picture, or write on their wall.  Ask them a hair or beauty question if you like! (www.facebook.com/MisikkoBeauty)

Please leave a separate comment for each form of entry.  So if you comment for the first entry, follow them on Twitter, and “like” them on Facebook, you should leave three comments in total.

The giveaway closes Thursday, August 5, 2010 at 11:59 pm.  A winner will be announced later that weekend.  Oh, and the winner must live in either the US or Canada.

Happy commenting, good luck, and a special thanks for Misikko for this giveaway (and changing my hair life!) :)

*PS Misikko didn’t pay me to say these nice things.  I said them because I believe them :)