Earlier this month, I posted about having to tighten up the old budget, and it seems that several of you are in the same boat. (As evil as it may sound, its a tad bit comforting to know I'm not the only one trying to keep my Amex in its place this summer!) The main thing to take a hit during this spending lockdown has been my clothing budget. I think I can count the number of closet covetables I've purchased since April on one hand. (A big fete for me!) But not far behind in the spending lockdown has been my beauty budget. Luckily, I have a small MAC store under my bathroom sink, so I've been in the clear there. But I've had to quickly reevaluate my $65 nightime moisturizer, weekly manicures, and like-clockwork highlights. I traded in the bank breaking moisturizer for a Neutrogena fave and have learned to embrace a bit of roots and stretch out my highlights. But one of the hardest things for me to give up has been my manicures.
Call me girly, call me high maintainance, whatever, but something about freshly painted nails just makes me happy. My love for pretty manicures does not translate however into the slightest ounce of skill when it comes to DIY manicures. Don't get me wrong, I've tried several times, and good heavens, was it a disaster! No matter how careful I was, no matter how still I tried to be, my manicures always looked like they were the work of a blindfolded first grader wearing thick wooly mittens. Uneven layers, polish halfway down my fingers...eesh, it was a mess. But a few weeks ago, this blog post by Lindsay changed my life. Seriously. Armed with determination and the realization that I had to cut back on my beauty budget, I gave her tips a go, and holy goodness, what do you know? It worked! I successfully did my own manicure and didn't have polish smeared on my elbow. Hallelulah!
Since then, I've sucessfully done two more at home manis, both better than the one before. So if you're like me and have been longing to get better at DIY manicures and save your bank account unneccesary strain, catch a few tips me...
1. Go read Lindsay's post.
2. Reread it, just to make sure you registered all that goodness. Seriously.
3. Start sheer, nude, and light with your polish color. The mistakes aren't as easy to see and you won't spend all night staring at that one spot. (I mean, its your first time, it won't be perfect!)
4. When painting your nails, start in the middle, painting a stripe down the center of your nail, then slowly moving toward the outside of the nail. Much easier this way!
And my favorite tip...
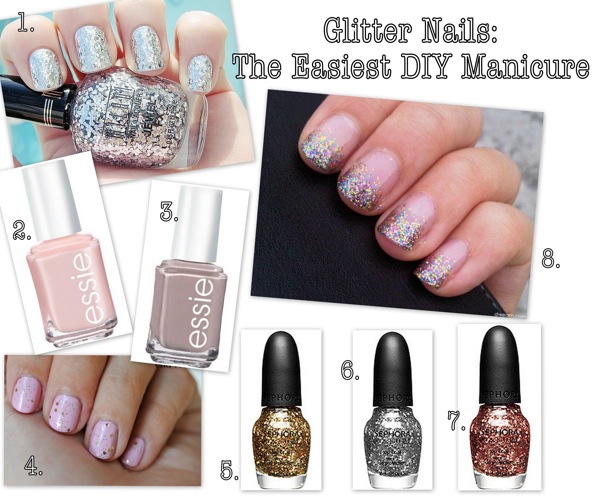
5. ADD GLITTER! I have always loved anything sparkly, glitter nails included, so imagine my delight when I realized glitter is the ideal coverup for not-quite-perfect nails. My first glitter go was silver layered over an Essie pink, and I can't stop squealing over my cotton candy princess nails. Now I'm dreaming of a minty green with glitter, glitter tips, glittered ring finger manicures, and black with gold glitter. Its a whole new world out there yall. Glitter is the perfect tool for DIY nail newbies!
Needless to say, me, my nails, and my bank account are happy campers. Expect to see lots of pretty paint jobs and loads of glittered nails around these parts. If I wasn't already, I'm officially smitten with glitter! And if you're a hopeless DIY manicurist, give these tips a try. I swear, if I can do, you can definitely do it!
Anyone else a hopeless manicure DIY-er or a glittered nail lover?


 {
{
9 comments:
My friends and I were more than a little obsessed with our nails in middle school. Painting them everyday for years helped me become a DIY manicure expert. I am a big fan of paint them evenly and everything that gets on your skin will come off easily in the shower and/or with lotion. I have seen a few great glitter nail pictures recently and am excited to do it for this weekend! :)
You have no idea how excited it makes me to know that my little tutorial helped someone! Seriously, I think I squealed when I read that you were able to paint your own nails because of it!
Please post pictures of your pretty glittery nails, I so want to see! Isn't doing your own nails fun?? You can switch it up as often as you want and don't have to feel guilty that you wasted your money on your manicure.
Glitter is such a fun way to spice up your nails a little - my next nail post involves some too!
Have a great long weekend, Allison!!
Oh my gosh I have a similar post on my blog today!! go check it out! lol crazy
i have ALWAYS done my own nails! I just can not afford to be paying for nails every week. Well i can... i just think my money can go to better things lol do it yourself!! trust me!! after lots of times doing it, you become a pro!
LOVE glitter polish. I actually called my mum the other day to see if I had left my beloved gold glitter from H&M at her house...kind of obsessed.
Such a great idea! I am tightening my budget too, and I am with you - my clothes budget has been hit the hardest! I have just been trying to love what I have and mix things up a little bit.
I love your wedding picture on the right column, so beautiful. Just found your blog and so glad I did!! :)
Oooo glitter! I am loving these suggestions for a diy mani and let's face it, glitter makes everything better!
Great idea to make staying on a budget sparkly and fun:)
What a great idea! Once you get the hang of a DIY manicure, it just gets easier.
I am now inspired to add glitter to my collection. I think my first one might be a cherry red base with some pretty gold sparkles :)
Any suggestions as to a particular brand that makes wonderful glitter polish?
I am terrible at it, and now I am obsessed with the new Shellac, keeps my nails hard and lasts for over 2 weeks...but it's $30 bucks a pop! EEK! I might have to get on the DIY bandwagon. Thanks for the tip!
“…something about freshly painted nails just makes me happy.” – I hear you! I do love the feel of newly-painted nails, especially if the color is fabulous! I’m not much of a glitter girl since I like my nail polish to look simple but stylish. But seeing your post, I think I would try it for a change!
Post a Comment