Thursday, June 30, 2011

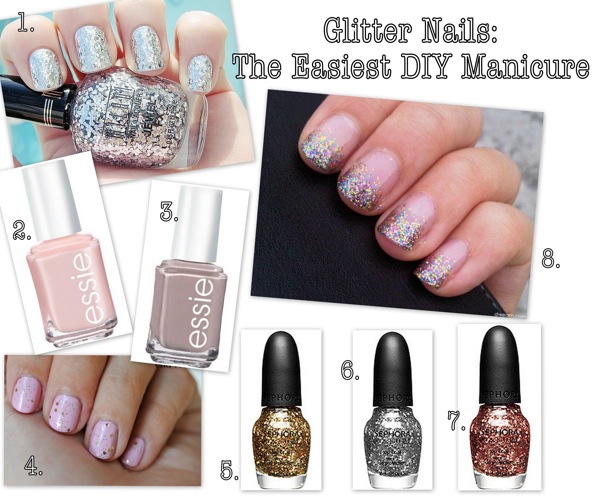
Glitter Nails: The Easiest DIY Manicure

Glitter{via}

Earlier this month, I posted about having to tighten up the old budget, and it seems that several of you are in the same boat.  (As evil as it may sound, its a tad bit comforting to know I'm not the only one trying to keep my Amex in its place this summer!)  The main thing to take a hit during this spending lockdown has been my clothing budget.  I think I can count the number of closet covetables I've purchased since April on one hand.  (A big fete for me!)  But not far behind in the spending lockdown has been my beauty budget.  Luckily, I have a small MAC store under my bathroom sink, so I've been in the clear there.  But I've had to quickly reevaluate my $65 nightime moisturizer, weekly manicures, and like-clockwork highlights.  I traded in the bank breaking moisturizer for a Neutrogena fave and have learned to embrace a bit of roots and stretch out my highlights.  But one of the hardest things for me to give up has been my manicures.

Call me girly, call me high maintainance, whatever, but something about freshly painted nails just makes me happy.  My love for pretty manicures does not translate however into the slightest ounce of skill when it comes to DIY manicures.  Don't get me wrong, I've tried several times, and good heavens, was it a disaster!  No matter how careful I was, no matter how still I tried to be, my manicures always looked like they were the work of a blindfolded first grader wearing thick wooly mittens.  Uneven layers, polish halfway down my fingers...eesh, it was a mess.  But a few weeks ago, this blog post by Lindsay changed my life.  Seriously.  Armed with determination and the realization that I had to cut back on my beauty budget, I gave her tips a go, and holy goodness, what do you know?  It worked! I successfully did my own manicure and didn't have polish smeared on my elbow.  Hallelulah!

Since then, I've sucessfully done two more at home manis, both better than the one before.  So if you're like me and have been longing to get better at DIY manicures and save your bank account unneccesary strain, catch a few tips me...

Recently Updated{12345678}

1. Go read Lindsay's post.
2. Reread it, just to make sure you registered all that goodness.  Seriously.
3. Start sheer, nude, and light with your polish color.  The mistakes aren't as easy to see and you won't spend all night staring at that one spot.  (I mean, its your first time, it won't be perfect!)
4. When painting your nails, start in the middle, painting a stripe down the center of your nail, then slowly moving toward the outside of the nail.  Much easier this way!

And my favorite tip...

5. ADD GLITTER!  I have always loved anything sparkly, glitter nails included, so imagine my delight when I realized glitter is the ideal coverup for not-quite-perfect nails.  My first glitter go was silver layered over an Essie pink, and I can't stop squealing over my cotton candy princess nails.  Now I'm dreaming of a minty green with glitter, glitter tips, glittered ring finger manicures, and black with gold glitter.  Its a whole new world out there yall.  Glitter is the perfect tool for DIY nail newbies!

Needless to say, me, my nails, and my bank account are happy campers.  Expect to see lots of pretty paint jobs and loads of glittered nails around these parts.  If I wasn't already, I'm officially smitten with glitter!  And if you're a hopeless DIY manicurist, give these tips a try.  I swear, if I can do, you can definitely do it!

Anyone else a hopeless manicure DIY-er or a glittered nail lover?

Tuesday, December 29, 2009

Lilac Lust

clip_image0013

Me here, just blogging about nail polish for the 545th time.  Ok not reeeeally the 545th time, but the 4th time (in four months) which makes me feel slightly pathetic, but whatever, I’m over it.  If you’ve been a following my blog for a little bit, you already know about my hate now L.O.V.E. relationship with dark nail polish.  Now that I’ve conquered both black and charcoal nail polish, I’m constantly keeping my eyes open for new or extended versions of these lovely and slightly gothic colors, and today, as I was watching Keeping Up with the Kardashians (which I am OBSESSED with), I spotted a new lovely goth color…lilac!  I’m not talking “pretty my little pony lilac,” I’m talking slightly matte, somewhat dirty, gray lilac.  It’s SO fabulous and I.must.have.it.now.  (Ok, not NOW, but definitely in the next three days.)  Problem is, I don’t know if I’ve seen any good slightly matte, somewhat dirty, gray lilacs on the shelf at my nail place, and since I don’t have the patience to date polish after polish, I’m needing some good recommendations.  So if you have lilac lust, share some hints with me!

Saturday, December 5, 2009

Success with Charcoal


I want to preface this post with the fact that I swear I have more to do with my life than get manicures and try out new dark nail polish.  Since I started my blog three months ago, I think I've blogged about dark nail polish three times.  I swear I have a life.  I promise, I really do.  However, this whole experimenting with dark polish has been such a process (now I am sounding like I have no life, process, seriously?  I scare myself sometimes.) So from black polish hater, to black polish lover, to mud-meets ink-meets lilac color gone wrong, to now, its been quite a journey.  But alas, I have FINALLY found the perfect dark nail polish.  And  mean perfect.  To all the people who are out there saying, "There's no such thing as perfect" I say yes there is.  And it's in a little bottle OPI bottle.  Its name: Baby It's Coal Outside.  (Cue the J.Simp/Nick Lachey tune.)  It's color is oh so charcoal, almost black, and with the slightest bit of shimmer glitter shine flutter (that's right, I made that up.  None of those words were appropriate, so flutter it is.)  It gives the traditional black just the slightest softness and is super easy to wear.  I've gotten it several times in a row now, and I have a feeling it won't be leaving my nails till mid March/  So for all those dark polish lovers out there, you have have have to try this color.  I know I'm certainly hoping for "coal" in my stocking this year!


I tried 890 times to snap a good picture of my own nails, but after all 890 attempts failed, I grabbed this one off the internet.  See what I mean about the "flutters?"  Perfection!

Tuesday, November 3, 2009

Black Gone...Blech


About a month ago, I blogged about my frustration with black nail polish, and after receiving lots of encouragement from friends and blog readers, I decided to give it one last try.  To my surprise (and delight), it looked good!  Even better, it continued looking good, and I was happy all week with my black nails and bad self.  Just to make sure this wasn't a fling, I tried it again the following week.  Again, the black looked good so I made a decision to take our relationship to the next level and make black nail polish a part of my daily look.  So after three weeks of a solid relationship, I realized I wasn't ready to be tied down; I wanted to play the field a little more.  So today I decided to venture out into OPI's Brights line and try My Private Jet, a shade just slightly off black with a bit of shimmer.  (Yes, I got lunchtime manicure, and yes it fabulous.)  And I'm not entirely sure why a black hue is in the Brights line, but whatever.  Two hours after my lunchtime manicure, I'm sitting in class (while blogging, bad I know), staring at my nails and totally rethinking this color.  While I was expecting a sort of gunmetal black/gray color, it's ended up looking like mud-meets ink-meets lilac color.  Certainly not what I was going for, and certainly not at all close to my recently so faithful OPI Black Onyx.  I guess this makes me look like those doofy guys who can't hang onto to a good girl when he sees one because he's too busy thinking about what could be with the other girls.  Ugh.  So I guess this is a lesson, and I guess walking around this week with mud-meets ink-meets lilac colored nails is my punishment.  Boo.

Wednesday, October 21, 2009

Make Your Mani Last


About a month ago, I made a resolution to focus on having manicured nails at all times.  Rereading that last statement, I realize it sounds like I have no life, but I swear I do (and I swear there is a point to this resolution!)  Your hands and nails are something that almost everyone sees and something you also spend a great deal of time staring at.  Whether your shaking hands, reviewing a paper with a student, or sitting in a meeting, people can see your nails.  Whether your texting, typing, or tweeting, you've got a close up view of your nails.  Lately, I've realized that having neatly manicured nails is one of the easiest and most effective ways to look put together and polished (no pun intended.)

However, after getting married, I've had to slightly reduce my "self management" budget (highlights, haircut, nails, facials, massage, clothes, makeup, etc.)  It's a little difficult to explain the reasoning behind a triple digit dollar hair appointment to my husband who gets his hair cut at Great Clips.  (I tried once to convince him to go to someone at a salon, which prompted him to say, "Well if I spend more money on a haircut, we'll have to take some money out of your hair budget to pay for it."  I quickly shut up and dropped the Great Clips issue.)  Anyway...with this reduced budget, I've been forced to be a little creative in making my luxories last.  More low lights, less highlights, digger deeper into my extensive MAC collection, shopping sales, shopping less, keeping with my classic perfumes instead of venturing out and trying two new ones at a time, you know, things that "responsible grown ups" do.  (Ugggh, I loathe all three of those words.)

So...combine my budget reduction with my manicure resolution and I'm in a tight spot, right?  Wrong!  I have found a way to stretch my manicures that is easier than easy.  About four days after my manicure, a day before the chipping would normally begin, I apply two coats of topcoat to my four day old manicure.  MAGICAL. Seriously, like Hogwart's level magical.  That top coat keeps my mani looking nice and fresh for another three days and then at that point, I'll add another top coat or two if I want to stretch it longer.  So while my manicure once lasted five days or so, I'm now stretching it double the time.  That's right people, just call me thrifty!  (Ok, thrifty might be a stretch for someone who gets multiple manicures in a month, but c'mon, it's a start.)  So cheers to my manicure maintaince and my reduced budget.  Who knew those two could be such good friends?

Tuesday, October 6, 2009

An Open Letter to Black Nail Polish


Dear Black Nail Polish,

It's time we have a conversation about our us. I've tried for over a year to make our relationship work, and after several ups and downs, I am left completely confused about where we stand. You look so good on Lauren Conrad, Whitney Port, Jessica Simpson, and many of my celebrity style friends, yet when I try to rock you, it just doesn't work out. So yesterday, I made my last attempt to reconcile our relationship, and to my surprise, we clicked. I left the nail place rocking my look and loving my black nails. But I've been here before, thinking we were clicking and that I could incorporate you into my look, only to be disappointed by my next encounter with you. So, if you could let me in the secret to capturing your heart for good I would appreciate it. But for this week at least, I'll enjoy being one of girls who rock the black nail polish.

Loving you for now,
Allison